Diagrammata
Diagrammata is based on the JavaScript version of Paul Harrison's Ghost Diagrams, which he created in order to demonstrate the tile assembly algorithm described in the seventh chapter of his PhD thesis. If you're interested in the theory of computation -- the tile assembly process is Turing equivalent! -- or just want a more detailed picture of how the process works, it's well worth the read.
The short version, from the superficial standpoint of making interesting pictures, is that the program allows you to make (or randomly generate) four- or six-sided tiles which are then semi-randomly assembled into larger patterns. These are often beautiful and surprising (and surprisingly beautiful), and sometimes demonstrate allotropy, i.e., different kinds of patterns can arise from the same simple set of tiles.
I've been working on extending Harrison's original program for some time now. The main change from the original, other than restructuring the user interface, has been to add the ability to export generated patterns as minimal paths with all of the adjacent tiles "welded" together. (It was already possible to export the generated SVG with discrete tiles.) I've also added copious comments to the almost entirely comment-free original in the process of figuring out how everything worked and begun reorganizing the code. (If you want to hack on it yourself, the source is available here. and is licensed under the GNU GPL v2.0.) I'm currently working on adding a graphical tile editor and replacing the random tile generation routines.
How It Works
If you want to jump right in and explore, the easiest thing is just to select some of the pre-generated patterns in the preset dropdown or click the randomize button. Clicking on any of the control labels will trigger popups explaining their functions.
On the other hand, if you want a detailed introduction, read on...
The User Interface
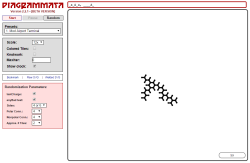
 The user interface is divided into three sections. The left-hand column
contains all of the controls except for the tile set itself, which appears at
the top of the right-hand side and can be edited directly there. The majority of
the right side is the pattern area where tiles are assembled into larger
patterns.
Action Buttons
The three buttons along the top control all of the action. (Re)Start begins the process of assembling tiles into a pattern. (This happens automatically when you select a preset.) Pause/Continue halts or resumes pattern assembly. And the Randomize button generates a set of random tiles and starts assembling them.

Presets
Right below the action buttons is the preset dropdown. Easily the most popular item for newbies and the casually curious, this is a list of several hundred tile sets with amusing names. Just select one and a pattern will be generated. Some tile sets will generate more than one kind of pattern, so try pressing the Restart button a few times.

Drawing Options
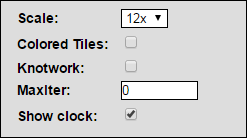
These all determine how the tiles and patterns are displayed. They can be changed both while a pattern is being generated and after generation is complete.

- Scale: Controls the displayed size of the pattern, defaulting to 12x. If you're using colored tiles (see below), you might want to kick this up to 24x or higher.
- Colored Tiles: By default, this is turned off, and all tiles are drawn as solid black, which makes it easier to see the pattern without being distracted by individual tiles. Turn this on, however, and each type of tile is assigned its own color, which makes it easy to see how the pattern is assembled from individual tiles.
- Knotwork: For certain patterns made of six-sided tiles, turning this on emulates Celtic knotwork.
- MaxIter: If this is non-zero, pattern generation will be terminated after this many iterations. This comes in handy for limiting the running times of randomly generated tile sets. By default, this is set to zero, and pattern assembly will continue endlessly, even if the tile set isn't actually suitable for assembling a pattern.
- Show Clock: On by default, this displays the current iteration count in the lower right-hand corner of the pattern area.
Export Links
Three buttons are provided to save patterns in various ways.

- URL: Reloads the page with the pattern stored as part of the URL. If you bookmark the resulting URL, the current pattern will be regenerated when you reload the bookmark.
- Tiles: Downloads the current pattern as an SVG file you can import into Inkscape, CorelDraw, Illustrator, and most other vector editors. In this form, the tiles are still separate and both colored tile and knotwork modes are preserved.
- Welded: Downloads the current pattern after merging adjacent tiles and eliminating the boundaries between them. (This can take a while, so be patient.) This form is especially suitable for use with laser and vinyl cutters, which is what it was originally developed for, but can also be quite useful in vector editors.
Randomization Parameters
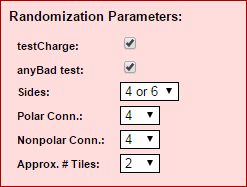
These options govern the random tile generation process. Some of them are mainly useful if you're actually digging into the source code to hack Diagrammata yourself, but a few may be useful to non-programmers.

- testCharge: Toggles an internal test that helps to make sure that randomly generated tiles are mutually compatible.
- anyBad: Toggles another internal test to reject tiles that are likely to be incompatible with other tiles in the set.
- Sides: All tiles are either four- or six-sided, and by default, either tiling geometry can be chosen by the random tile generator. You can force one or the other with this dropdown.
- Polar Conn: Controls the number of polar connectors that can be included in random tile sets. See below for how this works.
- Nonpolar Conn: Controls the number of non-polar connectors that can be included in random tile sets. See below for how this works.
- Approx. # Tiles: Sets the approximate number of tiles that will be included in random tile sets. This number is approximate because of the details of how the randomization process works, and may become a hard number in future versions.
Designing Your Own Tiles by Hand
Once you get bored with playing with presets and randomly generated tile sets, you can try your hand at designing your own by typing them straight into the tile set box at the top of the screen.
Each tile set consists of a set of character strings separated by spaces. The commas are optional and included for the sake of easy readability. All of the tiles in the same set must be either four or six characters long, which implicitly determines whether square or hexagonal tiles will be generated. Each character determines a particular kind of connector for that side of the tile. Exactly which side doesn't matter because the program rotates tiles as needed to fit them into the pattern. They are specified in counterclockwise order, which does matter because tiles can be rotated but not mirrored.

The character codes are as follows:
- Polar Connectors: Polar connectors come in pairs represented by uppercase and lowercase letters. A matches a, B matches b, and so on. The full English alphabet is supported.
- Non-Polar Connectors: Polar connectors are represented by numbers and match themselves, e.g., 0 matches 0, 1 matches 1, and so on. The digits 0-9 are supported.
- Special Connectors: The hyphen '-' and underscore '_' are special-purpose connectors. The hyphen is an invisible non-polar connector that matches a like connector in a neighboring tile, but it is not displayed. The underscore represents no connector, i.e., it matches either another underscore or an empty neighbor.
